
Search the Community
Showing results for tags 'guide'.
-
Heya! In this guide, you’ll learn how to properly record gameplay, file effective reports, and discover the best tools and websites to make the process quick and efficient. Whether you're a seasoned player or a newcomer, this tutorial will ensure you're prepared! Chapter 1 - Software for Ingame-Recording [EASY] Via Steam Game Recording 1. Open Steam, click the Steam icon on the top left corner 2. Find your way to "Game Recording" 3. Select "Record in Background" 4. Head to "Save the last xxx seconds of gameplay as a clip" -> I recommend saving the last 180 seconds (3 minutes). You can Click the "Set..." and choose a KEYBIND to save the last 180 seconds. (For Example, if you press "ALT+2", the clip will be saved) 5. Scroll down to "Recordings Folder" and choose a folder where the clip will be saved at. If you do not have a folder you like, simply create one. 6. You are ready to record! Launch TruckersMP and test it. Press the buttons you assigned (ALT+2). After that, head on over to the folder and check the recording. Whenever something happens, press your Hotkey to save the video. [EASY] Via Medal.TV 1. Visit this site https://medal.tv/ and download the program. Once installed, register yourself. 2. There will be a Setup. You can choose a username. 3. Next step is to configurate the recorder. You will be asked how do you wish to record. 4. In this menu, select "Clipping Games" and choose the duration you like. I recommend setting it to 3 Minutes. 5. Select a Storage Limit, depending on your free disk space. 6. Next, select a resolution, but minimum "Standart/720p". 7. Choose if you like to use your Mic and Audio. 8. You will be asked to Set up your Hotkey. Select any Key you want (For Example, if you press "ALT+2", the clip will be saved) 9. Done! You can now launch TruckersMP and play. Once something happens, just press your assigned key and the Clip will be saved to your Medal Dashboard. [Medium] Via Nvidia Experience Overlay. - Note: This will only work if you got a Nvidia Graphics Card 1. Install the Nvidia App and register -> https://www.nvidia.com/en-us/software/nvidia-app/ 2. Once opened, head to "Settings" and enable the "NVIDIA Overlay" 3. Now, press ALT + Z in order to open the overlay and press Settings in the Overlay 4. Click "Instant Replay" and "Configure video capture" 5. Select the length you want it to be, for example, I'm using 3 Minutes 6. Go back to the Start of the Overlay and press Settings once again 7. Navigate to "Shortcut controls" 8. Search for "Save last x minutes recorded" and set a keybind to your liking. (For Example, ALT + F2) 9. Go back to settings and search for "Files and disk space", click it once found 10. You can set a folder where you want your recording to be by just simply clicking "Gallery location" 11. Last but not least, head back to the Start and enable "Instant Replay" 12. You are ready to record! Launch TruckersMP and test it. Press the buttons you assigned (ALT+2). After that, head on over to the folder and check the recording. Whenever something happens, press your Hotkey to save the video. [Hard] Via OBS Software There is to pretty much to setup, I recommend Tutorials on YouTube. This one is pretty useful -> https://www.youtube.com/watch?v=t7FBPbaBw8U Chapter 2 - Important Things to know in order to be able to Report someone TruckersMP IDs -> Make sure you have TruckersMP IDs enabled. This will help you to find the person. How to enable it? 1. Press TAB to open the Tab-Menu 2. Right Click and click the settings icon 3. Head on over to "Interface" 4. Scroll down and find "Show player's TruckersMP ID". Enable it, if not already. Then press "Apply" and close the TAB menu -> Website Reporting Guidelines Make sure you are familiar with TruckersMP rules and the reporting rules. https://truckersmp.com/rules https://truckersmp.com/knowledge-base/article/8 https://truckersmp.com/knowledge-base/article/10 -> Important Reporting Rules The Evidence cannot be older than 7 days. Evidence must be available for at least 3 months. Except Reports for §2.1 and §3, they must remain permanently. Videos over 3min must contain a timestamp stated in the report, but they need to be at least 5 seconds long. You are only allowed to use your own recordings. They need to be uploaded to a site with an onboard streaming feature, no download. They must be uncropped, cannot be retouched or blurred. Videos need to be in a decent quality, so admins can easily recognise the names and IDs. Keep in mind you must follow the TruckersMP rules aswell. It's possible that you will also be banned from your own report (for example, if you speed up to prevent an overtake). Fill in the necessary information, and shortly explain what happened in the description. Also place the Evidence Link into the description. Please note: These are only a few of the rules. Check this article to get a full overview: https://truckersmp.com/knowledge-base/article/10 Chapter 3 - How to edit your Video The best and easiest way to edit a Video is by using the default Windows "Films & TV" app. Just open the video file and click the small "pen" icon, then crop video. You can now crop it by your liking. -> You can use other Apps aswell, for example CapCut for PC,... Chapter 4 - Choosing a good Site to upload Videos/Evidence Video Evidence -> Best way to go is https://www.youtube.com/, simply upload a video there. It is recommended to set it to "not listed" and to disable comments, but not necessary. -> Another good site is https://streamable.com/, but you need to make sure your videos stay there for at least 3 months. -> Another way is https://vimeo.com/features/online-video-hosting Screenshots -> Best way to go is https://imgur.com/ or https://imgbb.com Chapter 5 - Q&A Q: I've created a report, how long will it take for it to be processed? A: Depending on the load on the web report system, it can take a few days or less. Q: I can only create 10 reports, why? A: This is because the Game Moderation Team is being asked to rate the quality of the reports. This is being used to help get rid of the majority of useless reports that currently come through the system. Q: My Report score went down by 2, now I can only create 8 reports. (Or less) A: (Regularly) submitting reports that are not of high quality may lead to you being able to report less and eventually not at all. If the GMT decides your report is "useless", you will be able to create 2 less reports. Q: Is it possible for my Report Score to go up? A: Yes, in most cases they go up by 1 if the report is of high quality and it's not on popular routes like C-D, Kirkenes,... Once some of your reports have gained positive points from a Moderator, you will have a higher report limit. Q: Is there any other Frequently Asked Questions for me to take a look? A: Absolutley, check it here: https://truckersmp.com/knowledge-base/article/10 That's it for now, I hope this helps! Do you enjoy my content? Feel free to leave a comment Best regards, Leon

-
This guide will help show you how to customise your license plate I first discovered this through learning how to get simple logos onto the plates, such as the Instagram and Facebook logo. After realising that all the code does is pull the image from the game files, I decided to dig into the files to try and find examples of textures that could be used as a plate background. I have provided a step-by-step guide which explains in detail two different options of styles you can use as a background for your plate and what each line of the final code means and how it affects the plate, however, if you are after the final code and don't want to spend the time reading through the guide, then skip to Option 1 - Step 6 or Option 2 - Step 4 and copy the final line of code there or choose any of the other options to quickly copy and use. STEP 1: First of all, you need to choose the truck/car you want to change the plate of. You can stay in-game for this entire process as you are simply editing a save and then loading a new one up. Once you have the truck/car you want to use, save the game. STEP 2: Access the new game save through the game.sii in Euro Truck Simulator 2/profiles/ProfileNumber/SaveNumber/game.sii (ProfileNumber and SaveNumber will be different depending on how many game saves you have and the name of your profile. STEP 3: Once you have opened your game.sii file, you can search for it two different ways. The best way I find is to search for your truck by using its current license plate which is Option A. However, you can use Option B to search for the truck you are currently using if you do not know the registration or cannot search for it. Option A: Search by Registration Option B: Search by Current Truck STEP 4: In this step, you can begin choosing which style you are wanting to use for your plate. There are two ways to do this; You can choose either Option 1 or Option 2. Option 1 is the most customisable way to make your plate by choosing any background colour and text with any country font you would like. Option 2 provides specific fading coloured backgrounds (Either Black or Blue) with a surrounding border which make the plate look more realistic and will allow you to tint it slightly for a cooler result. Option 1 - Standard coloured background for basic custom plates If you do not want to build your code, you can skip to Step 6 and copy the final code Step 1: Choosing the background colour To first build how you want your plate to be, you need to start customising values. To begin, we start by choosing the colour value which has to be written in the format <color value=######> I have chosen Blue for this example which will be written as the following: <color value=FFCCA72D> Step 2: Choosing either with country flag and lettering or without Once the colour is in place, we need to move onto how we will position the background on top of the plate which has to be written in the format <margin left=##>. The default to have a full coloured plate will be -15, however if you would like your plate to display the country flag and lettering on the side, then use 0 as the value. I have chosen to have the background cover the entire plate so I will use -15 as the value. Place this text next to the color value text leaving no spaces. <margin left=-15> Step 3: Inserting the dimensions of the background so that it fits onto the plate Now we need to insert the background as an image onto the plate and give it the necessary details to make sure it is aligned properly. To do this, we need to begin the code with <img src= and then link the background along with the relevant code to ensure its aligned properly. To do this we use xscale=stretch yscale=stretch><ret><margin left=0>align hstyle=center vstyle=center> to ensure the background is aligned in the correct position. This is the full code to use for the background and this needs to then be place after the margin left value leaving no spaces. <img src=/material/ui/white.mat xscale=stretch yscale=stretch><ret><margin left=0><align hstyle=center vstyle=center> Step 4: Font Size You can now choose how big you want your font to be, here are some examples of some sizes: Font Size 1.0 Font Size 1.1 Font Size 1.2 Font Size 1.3 Font Size 1.4 Font Size 1.5 These are just a few examples, however, feel free to experiment with the x and y scale values if you prefer to have the text stretched out more. For this example, I will choose 1.2 which will look like this in the code which then needs to be placed after the previous code value leaving no spaces. <font xscale=1.2 yscale=1.2> Step 5: Adding Text and Text Colour Now similar to how we put in the code for our background colour, we now need to define the colour for our plate text. For this example, I've chosen black so this is what I will put into the code <color value=FF000000> Once we've decided the colour, we can now put in the text we want our plate to say. Make sure this is after the > on the colour value text Step 6: Adding the Region Code To finish off we need to now add the region code in the format |country so that the game knows which font to use from the associated country. As I want the UK plate text, I will use |uk at the end of my code which then can be finished with ending quotation marks. So this will be our final result: license_plate: "<color value=FFCCA72D><margin left=-15><img src=/material/ui/white.mat xscale=stretch yscale=stretch><ret><margin left=0><align hstyle=center vstyle=center><font xscale=1.2 yscale=1.2><color value=FF000000>OLIOAK|uk" which will now look like this in-game: Once you've finished your code and ensured that it is surrounded by quotation marks, save the file and then load the save in-game to see your plate! Option 2 - Fading background and borders with tint options If you do not want to build your code, you can skip to Step 4 and copy the final code Step 1: Choosing the background From here, you can use this following image path to put the black license plate image onto the plate. /material/ui/lp/turkey/duty_rear.mat As it acts like any regular image on a license plate, it needs to include the <img src= at the beginning of it and have > at the end of the code. You can also then choose whether to have the country flag and lettering on the left hand side of the plate. If you do not want this, put the code listed below before the <img src= code <margin left=-15> Step 1a: Choosing the tint (Optional) Then the outline/tint colour has to be given which is usually White, so the following needs to be placed after the previous code but before the > at the end: color=FFFFFFFF This can be changed to any hex code to change the tint of the image Here are some examples of using different tints on the black background Blue tinted background with no country flag using Font Size 1.2 Pink tinted background with no country flag using Font Size 0.9 Step 2: Inserting the dimensions of the background so that it fits onto the plate Now we need to insert the background as an image onto the plate and give it the necessary details to make sure it is aligned properly. To do this, we need to begin the code with <img src= and then link the background along with the relevant code to ensure its aligned properly. To do this we use xscale=stretch yscale=stretch><ret><margin left=0>align hstyle=center vstyle=center> to ensure the background is aligned in the correct position. This is the full code to use for the background and this needs to then be place after the margin left value leaving no spaces. xscale=stretch yscale=stretch><ret><margin left=0><align hstyle=center vstyle=center> Step 3: Text colour To finish, we then set the colour of the text (which is optional but it is recommended to be able to actually see the plate as the default is FF000000 which is Black). This is set by using this: <color value=FF999999> Step 4: Region code Now the code part of it is complete, you must then write the text of your license plate which in this case was GN17 NBM and then finish up with the |country code to complete. The final code for this example is: license_plate: "<img src=/material/ui/lp/turkey/duty_rear.mat color=FFFFFFFF xscale=stretch yscale=stretch><ret><margin left=0><align hstyle=center vstyle=center><color value=FF999999>GN17 NBM|uk" Which looks like this in-game: Option 2 - Other Styles Blue Background: The blue Turkish plate background uses this code: /material/ui/lp/turkey/police_rear.mat and looks like this: The entire line of code for this is: license_plate: "<img src=/material/ui/lp/turkey/police_rear.mat color=FFFFFFFF xscale=stretch yscale=stretch><ret><margin left=0><align hstyle=center vstyle=center><color value=FFFFFFFF>GN17 NBM|uk" Different Countries: An example of using a different country is this example of Luxembourg: |luxembourg and looks like this: The entire line of code for this is: license_plate: "<img src=/material/ui/lp/turkey/duty_rear.mat color=FFFFFFFF xscale=stretch yscale=stretch><ret><margin left=0><align hstyle=center vstyle=center><color value=FF999999>OLIOAK|luxembourg" Other Backgrounds: Option 1 is aimed at using a basic simple white image to create a basic background whereas Option 2 is aimed at using the two coloured Turkish plates with the plate fading background and border which are already in the game files, however, it is possible to use any .mat image found in the game files as long as you use the correct file path after '<img src=' meaning it is therefore possible to dig into the game files and find textures that allow for even more different colours. Thank you for taking the time to read this guide and feel free to share any comments you have about this guide or any additional textures you've found that work well and I would LOVE to see screenshots of your creations you've made with the help of this guide! ? I do hope this guide helped and provided a better understanding of how the license plates work in-game and the ability to customise them further. I understand that this guide could've been simpler by providing the final code for those who are not bothered and just want the final result, however, I wanted to provide a step by step instruction to actually help readers have a better understanding of how it exactly works line by line.
- 31 replies
-
- 21
-

-

-

-

-

-

-
- saveediting
- guide
- (and 1 more)
-
Step n°15: Now save your file, enter your game and upload your file.
-
How to change my login background? You can change the background by modifying the file. 1. Using Win + R, into the Programdata Files. -> The programdata file is hidden on the operating system. Open the file by pressing the Win + R keys and typing "%Programdata%". 2. If you open programdata files, goto "TruckersMP/data/ets2_mod/ui" folder -> Edit this file to modify your background 3. If you open ui folder, you can't find anything that background set. -> Find the background picture you want and rename it to "backgroud0.png", "background1.png", "background2.png" and paste it into that folder. If you have completed up to step 3, the setting is complete. Q: I can't find ets2_mod files. What Can I do? A: if you can't find ets2_mod files or not created, you create it. If you want to more information, please reply to this topic.
-
In-Game UI (User Interface) Customisation This guide will cover how to find community created UI's, how to install UI's (with the official Launcher), and how to design your own custom UI. A few examples of UI's I have created: Finding Community UI's Installing Custom UI's Designing Your Own UI If you need any help at all with UI's, or find something was not covered in this guide please let me know below. Good luck!
- 74 replies
-
- 19
-
-
-
-
- ui
- customisation
- (and 2 more)
-
AMERICAN TRUCK SIMULATOR " GAME.SII" FILE CONTENT VERSION #1 NOTE: It will be updated as soon as possible. NEW FEATURES: --COLOURED. --EXHAUST ADDED. --SUN VISOR ADDED. *****MOTOR KODLARI**ENGINE CODS** Kenworth W900 (625HP): /def/vehicle/truck/kenworth.w900/engine/catc15.sii International LoneStar (605HP): /def/vehicle/truck/intnational.lonestar/engine/x15_605.sii Peterblit 389 (625HP): /def/vehicle/truck/peterbilt.389/engine/catc15.sii Peterblit 579 (600HP): /def/vehicle/truck/peterbilt.579/engine/isx15_600.sii Volvo VNL (600HP): /def/vehicle/truck/volvo.vnl/engine/d16_600.sii Kenworth T680 (600HP): /def/vehicle/truck/kenworth.t680/engine/isx15_600.sii *****ŞANZIMAN KODLARI**TRANSMISSION CODS** --6-VİTES RETARDERLİ**6-GEAR WITH RETARDER** Kenworth W900: /def/vehicle/truck/kenworth.w900/transmission/allison_retarder.sii International LoneStar: /def/vehicle/truck/intnational.lonestar/transmission/allison_retarder.sii Peterblit 389: /def/vehicle/truck/peterbilt.389/transmission/allison_retarder.sii Peterblit 579: /def/vehicle/truck/peterbilt.579/transmission/allison_retarder.sii Volvo VNL: /def/vehicle/truck/volvo.vnl/transmission/allison_retarder.sii Kenworth T680: /def/vehicle/truck/kenworth.t680/transmission/allison_retarder.sii --18-VİTES RETARDERLİ**18 GEAR WITH RETARDER** Kenworth W900: /def/vehicle/truck/kenworth.w900/transmission/18_speed_retarder.sii International LoneStar: /def/vehicle/truck/intnational.lonestar/transmission/18_speed_retarder.sii Peterblit 389: /def/vehicle/truck/peterbilt.389/transmission/18_speed_retarder.sii Peterblit 579: /def/vehicle/truck/peterbilt.579/transmission/18_speed_retarder.sii Volvo VNL: /def/vehicle/truck/volvo.vnl/transmission/18_speed_retarder.sii Kenworth T680: /def/vehicle/truck/kenworth.t680/transmission/18_speed_retarder.sii KABİN KODLARI**CABIN CODS** --KÜÇÜK KABİN**SMALL CABIN** Kenworth W900 Day Cab: /def/vehicle/truck/kenworth.w900/cabin/duty.sii International LoneStar Day Cab: /def/vehicle/truck/intnational.lonestar/cabin/day.sii Peterblit 389 Day Cab: /def/vehicle/truck/peterbilt.389/cabin/duty.sii Peterblit 579 Duty Cabin: /def/vehicle/truck/peterbilt.579/cabin/duty.sii Volvo VNL 300: /def/vehicle/truck/volvo.vnl/cabin/duty.sii Kenworth T680 Duty Day Cabin: /def/vehicle/truck/kenworth.t680/cabin/duty.sii --NORMAL KABİN**MEDIUM CABIN** Kenworth W900 Studio Sleeper: /def/vehicle/truck/kenworth.w900/cabin/standard.sii International LoneStar High Rise Sleeper: /def/vehicle/truck/intnational.lonestar/cabin/hirise.sii Peterblit 389 Low Roof Sleeper: /def/vehicle/truck/peterbilt.389/cabin/standard.sii Peterblit 579 Stand Up Sleeper: /def/vehicle/truck/peterbilt.579/cabin/standard.sii Volvo VNL 730: /def/vehicle/truck/volvo.vnl/cabin/standard.sii Kenworth T680 Mid Roof Sleeper: /def/vehicle/truck/kenworth.t680/cabin/standard.sii --BÜYÜK KABİN**LARGE CABIN** Kenworth W900 Aero Cab Sleeper: /def/vehicle/truck/kenworth.w900/cabin/exclusive.sii International LoneStar Sky Rise Sleeper: /def/vehicle/truck/intnational.lonestar/cabin/skyrise.sii Peterblit 389 Ultra Cab Sleeper: /def/vehicle/truck/peterbilt.389/cabin/exclusive.sii Peterblit 579 Hi Rise Sleeper: /def/vehicle/truck/peterbilt.579/cabin/exclusive.sii Volvo VNL 780: /def/vehicle/truck/volvo.vnl/cabin/exclusive.sii Kenworth T680 Hi Rise Sleeper: /def/vehicle/truck/kenworth.t680/cabin/exclusive.sii İÇ MEKAN**INTERIOR** Kenworth W900: /def/vehicle/truck/kenworth.w900/interior/standard.sii /def/vehicle/truck/kenworth.w900/interior/exclusive.sii International LoneStar: /def/vehicle/truck/intnational.lonestar/interior/sky_std.sii /def/vehicle/truck/intnational.lonestar/interior/sky_tex.sii /def/vehicle/truck/intnational.lonestar/interior/sky_lux.sii Peterblit 389: /def/vehicle/truck/peterbilt.389/interior/hi_std.sii /def/vehicle/truck/peterbilt.389/interior/hi_lux.sii Peterblit 579: /def/vehicle/truck/peterbilt.579/interior/standard.sii /def/vehicle/truck/peterbilt.579/interior/exclusive.sii Volvo VNL: /def/vehicle/truck/volvo.vnl/interior/cab_cs.sii /def/vehicle/truck/volvo.vnl/interior/cab_ce.sii Kenworth T680: /def/vehicle/truck/kenworth.t680/interior/cab_c_s_g.sii /def/vehicle/truck/kenworth.t680/interior/cab_c_n_g.sii /def/vehicle/truck/kenworth.t680/interior/cab_c_s_b.sii /def/vehicle/truck/kenworth.t680/interior/cab_c_n_b.sii ŞASİ KODLARI**CHASSIS CODS** Kenworth W900: Short 6X2 150gal: /def/vehicle/truck/kenworth.w900/chassis/short1_6x2.sii Short 6X2 Hareketli Orta Dingil 150gal: /def/vehicle/truck/kenworth.w900/chassis/short1_6x2_ml.sii Short 6X4 150gal: /def/vehicle/truck/kenworth.w900/chassis/short1.sii Short 6X2 200gal: /def/vehicle/truck/kenworth.w900/chassis/short2_6x2.sii Short 6X2 Hareketli Orta Dingil 200gal: /def/vehicle/truck/kenworth.w900/chassis/short2_6x2_ml.sii Short 6X4 200gal: /def/vehicle/truck/kenworth.w900/chassis/short2.sii Long 6X2 220gal: /def/vehicle/truck/kenworth.w900/chassis/long1_6x2.sii Long 6X2 Hareketli Orta Dingil 220gal: /def/vehicle/truck/kenworth.w900/chassis/long1_6x2_ml.sii Long 6X4 220gal: /def/vehicle/truck/kenworth.w900/chassis/long1.sii Long 6X2 300gal: /def/vehicle/truck/kenworth.w900/chassis/long2_6x2.sii Long 6X2 Hareketli Orta Dingil 300gal: /def/vehicle/truck/kenworth.w900/chassis/long2_6x2_ml.sii Long 6X4 300gal: /def/vehicle/truck/kenworth.w900/chassis/long2.sii International LoneStar: Short 6X2 140gal: /def/vehicle/truck/intnational.lonestar/chassis/6x2_short_70.sii Short 6X4 140gal: /def/vehicle/truck/intnational.lonestar/chassis/6x4_short_70.sii Short 6X2 200gal: /def/vehicle/truck/intnational.lonestar/chassis/6x2_short_100.sii Short 6X4 200gal: /def/vehicle/truck/intnational.lonestar/chassis/6x4_short_100.sii Medium 6X2 240gal: /def/vehicle/truck/intnational.lonestar/chassis/6x2_mid_120.sii Medium 6X4 240gal: /def/vehicle/truck/intnational.lonestar/chassis/6x4_mid_120.sii Medium 6X2 280gal: /def/vehicle/truck/intnational.lonestar/chassis/6x2_mid_140.sii Medium 6X4 280gal: /def/vehicle/truck/intnational.lonestar/chassis/6x4_mid_140.sii Long 6X2 240gal: /def/vehicle/truck/intnational.lonestar/chassis/6x2_long_120.sii Long 6X4 240gal: /def/vehicle/truck/intnational.lonestar/chassis/6x4_long_120.sii Long 6X2 280gal: /def/vehicle/truck/intnational.lonestar/chassis/6x2_long_140.sii Long 6X4 280gal: /def/vehicle/truck/intnational.lonestar/chassis/6x4_long_140.sii Peterblit 389: Short 6X2 150gal: /def/vehicle/truck/peterblit.389/chassis/short1_6x2.sii Short 6X2 Hareketli Orta Dingil 150gal: /def/vehicle/truck//peterblit.389/chassis/short1_6x2_ml.sii Short 6X4 150gal: /def/vehicle/truck/peterblit.389/chassis/short1.sii Short 6X2 200gal: /def/vehicle/truck/peterblit.389/chassis/short2_6x2.sii Short 6X2 Hareketli Orta Dingil 200gal: /def/vehicle/truck//peterblit.389/chassis/short2_6x2_ml.sii Short 6X4 200gal: /def/vehicle/truck/peterblit.389/chassis/short2.sii Long 6X2 220gal: /def/vehicle/truck/peterblit.389/chassis/long1_6x2.sii Long 6X2 Hareketli Orta Dingil 220gal: /def/vehicle/truck/peterblit.389/chassis/long1_6x2_ml.sii Long 6X4 220gal: /def/vehicle/truck/peterblit.389/chassis/long1.sii Long 6X2 300gal: /def/vehicle/truck/peterblit.389/chassis/long2_6x2.sii Long 6X2 Hareketli Orta Dingil 300gal: /def/vehicle/truck//peterblit.389/chassis/long2_6x2_ml.sii Long 6X4 300gal: /def/vehicle/truck/peterblit.389/chassis/long2.sii Peterblit 579: Short 6X2 150gal: /def/vehicle/truck/peterblit.579/chassis/short1_6x2.sii Short 6X2 Hareketli Orta Dingil 150gal: /def/vehicle/truck/peterblit.579/chassis/short1_6x2_ml.sii Short 6X4 150gal: /def/vehicle/truck/peterblit.579/chassis/short1.sii Short 6X2 200gal: /def/vehicle/truck/peterblit.579/chassis/short2_6x2.sii Short 6X2 Hareketli Orta Dingil 200gal: /def/vehicle/truck/peterblit.579/chassis/short2_6x2_ml.sii Short 6X4 200gal: /def/vehicle/truck/peterblit.579/chassis/short2.sii Long 6X2 220gal: /def/vehicle/truck/peterblit.579/chassis/long1_6x2.sii Long 6X2 Hareketli Orta Dingil 220gal: /def/vehicle/truck/peterblit.579/chassis/long1_6x2_ml.sii Long 6X4 220gal: /def/vehicle/truck/peterblit.579/chassis/long1.sii Long 6X2 300gal: /def/vehicle/truck/peterblit.579/chassis/long2_6x2.sii Long 6X2 Hareketli Orta Dingil 300gal: /def/vehicle/truck/peterblit.579/chassis/long2_6x2_ml.sii Long 6X4 300gal: /def/vehicle/truck/peterblit.579/chassis/long2.sii Volvo VNL: Short 6X2 150gal: /def/vehicle/truck/volvo.vnl/chassis/short1_6x2.sii Short 6X2 Hareketli Orta Dingil 150gal: /def/vehicle/truck/volvo.vnl/chassis/short1_6x2_ml.sii Short 6X4 150gal: /def/vehicle/truck/volvo.vnl/chassis/short1.sii Short 6X2 200gal: /def/vehicle/truck/volvo.vnl/chassis/short2_6x2.sii Short 6X2 Hareketli Orta Dingil 200gal: /def/vehicle/truck/volvo.vnl/chassis/short2_6x2_ml.sii Short 6X4 200gal: /def/vehicle/truck/volvo.vnl/chassis/short2.sii Long 6X2 220gal: /def/vehicle/truck/volvo.vnl/chassis/long1_6x2.sii Long 6X2 Hareketli Orta Dingil 220gal: /def/vehicle/truck/volvo.vnl/chassis/long1_6x2_ml.sii Long 6X4 220gal: /def/vehicle/truck/volvo.vnl/chassis/long1.sii Long 6X2 300gal: /def/vehicle/truck/volvo.vnl/chassis/long2_6x2.sii Long 6X2 Hareketli Orta Dingil 300gal: /def/vehicle/truck/volvo.vnl/chassis/long2_6x2_ml.sii Long 6X4 300gal: /def/vehicle/truck/volvo.vnl/chassis/long2.sii Kenworth T680: Short 6X2 150gal: /def/vehicle/truck/kenworth.t680/chassis/short1_6x2.sii Short 6X2 Hareketli Orta Dingil 150gal: /def/vehicle/truck/kenworth.t680/chassis/short1_6x2_ml.sii Short 6X4 150gal: /def/vehicle/truck/kenworth.t680/chassis/short1.sii Short 6X2 200gal: /def/vehicle/truck/kenworth.t680/chassis/short2_6x2.sii Short 6X2 Hareketli Orta Dingil 200gal: /def/vehicle/truck/kenworth.t680/chassis/short2_6x2_ml.sii Short 6X4 200gal: /def/vehicle/truck/kenworth.t680/chassis/short2.sii Long 6X2 220gal: /def/vehicle/truck/kenworth.t680/chassis/long1_6x2.sii Long 6X2 Hareketli Orta Dingil 220gal: /def/vehicle/truck/kenworth.t680/chassis/long1_6x2_ml.sii Long 6X4 220gal: /def/vehicle/truck/kenworth.t680/chassis/long1.sii Long 6X2 300gal: /def/vehicle/truck/kenworth.t680/chassis/long2_6x2.sii Long 6X2 Hareketli Orta Dingil 300gal: /def/vehicle/truck/kenworth.t680/chassis/long2_6x2_ml.sii Long 6X4 300gal: /def/vehicle/truck/kenworth.t680/chassis/long2.sii *****TAMPON KODLARI**BUMPER CODS** Kenworth W900 Standart: /def/vehicle/truck/kenworth.w900/accessory/bumper/shape01.sii Modern: /def/vehicle/truck/kenworth.w900/accessory/bumper/shape02.sii Shield: /def/vehicle/truck/kenworth.w900/accessory/bumper/shape03.sii Firefly: /def/vehicle/truck/kenworth.w900/accessory/bumper/shape4.sii Quarterback: /def/vehicle/truck/kenworth.w900/accessory/bumper/shape05.sii International LoneStar Standart: /def/vehicle/truck/intnational.lonestar/accessory/bumper/standard.sii Sensor: /def/vehicle/truck/intnational.lonestar/accessory/bumper/sensor.sii Peterblit 389 Standart: /def/vehicle/truck/peterbilt.389/accessory/bumper/shape01.sii Modern: /def/vehicle/truck/peterbilt.389/accessory/bumper/shape02.sii Modern Flares: /def/vehicle/truck/peterbilt.389/accessory/bumper/shape03.sii Standart Flares: /def/vehicle/truck/peterbilt.389/accessory/bumper/shape04.sii Modern Flares 2: /def/vehicle/truck/peterbilt.389/accessory/bumper/shape05.sii Peterblit 579 Duty: /def/vehicle/truck/peterbilt.579/accessory/bumper/shape01.sii Standart: /def/vehicle/truck/peterbilt.579/accessory/bumper/shape02.sii Chromed: /def/vehicle/truck/peterbilt.579/accessory/bumper/shape03.sii Chromed Large: /def/vehicle/truck/peterbilt.579/accessory/bumper/shape04.sii Chromed Large Flares: /def/vehicle/truck/peterbilt.579/accessory/bumper/shape05.sii Volvo VNL Modern 1: /def/vehicle/truck/volvo.vnl/accessory/bumper/shape07.sii Classic 1: /def/vehicle/truck/volvo.vnl/accessory/bumper/shape01.sii Chromed 1: /def/vehicle/truck/volvo.vnl/accessory/bumper/shape04.sii Modern 2: /def/vehicle/truck/volvo.vnl/accessory/bumper/shape08.sii Classic 2: /def/vehicle/truck/volvo.vnl/accessory/bumper/shape02.sii Chromed 2: /def/vehicle/truck/volvo.vnl/accessory/bumper/shape05.sii Modern 3: /def/vehicle/truck/volvo.vnl/accessory/bumper/shape09.sii Classic 3: /def/vehicle/truck/volvo.vnl/accessory/bumper/shape03.sii Chromed 3: /def/vehicle/truck/volvo.vnl/accessory/bumper/shape06.sii Kenworth T680 Standart: /def/vehicle/truck/kenworth.t680/accessory/bumper/shape01.sii Painted: /def/vehicle/truck/kenworth.t680/accessory/bumper/shape02.sii Chromed: /def/vehicle/truck/kenworth.t680/accessory/bumper/shape03.sii Chromed Large: /def/vehicle/truck/kenworth.t680/accessory/bumper/shape04.sii Chromed Large Flares: /def/vehicle/truck/kenworth.t680/accessory/bumper/shape05.sii *****HAVA FİLTRELERİ**AIR FİLTERS** Kenworth W900 Basic Air Filters: /def/vehicle/truck/kenworth.w900/accessory/filters/shape01.sii Air Filters With Light Bars: /def/vehicle/truck/kenworth.w900/accessory/filters/shape02.sii International LoneStar Default Air Filters: /def/vehicle/truck/intnational.lonestar/accessory/filters/standard.sii Air Filters Small Flares: /def/vehicle/truck/intnational.lonestar/accessory/filters/flare_small.sii Air Filters Big Flares: /def/vehicle/truck/intnational.lonestar/accessory/filters/flare_big.sii Peterblit 389 Basic Air Filters: /def/vehicle/truck/peterbilt.389/accessory/filters/shape05.sii Exclusive Air Filters: /def/vehicle/truck/peterbilt.389/accessory/filters/shape02.sii Chrome Air Filters: /def/vehicle/truck/peterbilt.389/accessory/filters/shape01.sii Air Filters With Lights: /def/vehicle/truck/peterbilt.389/accessory/filters/shape06.sii Exclusive Air Filters With Lights: /def/vehicle/truck/peterbilt.389/accessory/filters/shape04.sii Chrome Air Filters With Lights: /def/vehicle/truck/peterbilt.389/accessory/filters/shape03.sii *****KORUMA DEMİRİ**PROTECTION GRILL** Peterblit 579 Bull Bar Simple: /def/vehicle/truck/peterbilt.579/accessory/f_grill/shape03.sii Bull Bar: /def/vehicle/truck/peterbilt.579/accessory/f_grill/shape01.sii Bull Bar Extra Large: /def/vehicle/truck/peterbilt.579/accessory/f_grill/shape04.sii Bull Bar Fencing: /def/vehicle/truck/peterbilt.579/accessory/f_grill/shape03.sii Volvo VNL Bull Bar Small: /def/vehicle/truck/volvo.vnl/accessory/f_grill/shape01.sii Bull Bar Big: /def/vehicle/truck/volvo.vnl/accessory/f_grill/shape02.sii Bull Bar Black: /def/vehicle/truck/volvo.vnl/accessory/f_grill/shape03.sii Kenworth T680 Bull Bar: /def/vehicle/truck/kenworth.t680/accessory/f_grill/shape01.sii Bull Bar Black: /def/vehicle/truck/kenworth.t680/accessory/f_grill/shape02.sii Bull Bar Large: /def/vehicle/truck/kenworth.t680/accessory/f_grill/shape03.sii Bull Bar Extra Large: /def/vehicle/truck/kenworth.t680/accessory/f_grill/shape04.sii *****SİNEKLİK**SWATTER** Kenworth W900 /def/vehicle/truck/kenworth.w900/accessory/deflector/shape01.sii /def/vehicle/truck/kenworth.w900/accessory/deflector/shape02.sii Peterblit 389 /def/vehicle/truck/peterbilt.389/accessory/deflector/shape01.sii /def/vehicle/truck/peterbilt.389/accessory/deflector/shape02.sii Peterblit 579 /def/vehicle/truck/peterbilt.579/accessory/deflector/shape01.sii /def/vehicle/truck/peterbilt.579/accessory/deflector/shape02.sii Volvo VNL /def/vehicle/truck/volvo.vnl/accessory/deflector/shape01.sii /def/vehicle/truck/volvo.vnl/accessory/deflector/shape02.sii /def/vehicle/truck/volvo.vnl/accessory/deflector/shape03.sii Kenworth T680 /def/vehicle/truck/kenworth.t680/accessory/deflector/shape01.sii /def/vehicle/truck/kenworth.t680/accessory/deflector/shape02.sii *****GÜNEŞ SİPERİ**SUN VIZOR** Kenworth W900 Standart Sunshield: /def/vehicle/truck/kenworth.w900/accessory/sunshield/shape01.sii Blind Mount Visor: /def/vehicle/truck/kenworth.w900/accessory/sunshield/shape02.sii International LoneStar Standart Sunshield: /def/vehicle/truck/intnational.lonestar/accessory/sunshield/standard.sii Chrome Sunshield: /def/vehicle/truck/intnational.lonestar/accessory/sunshield/chrome.sii Chrome Sun Visor Sharp: /def/vehicle/truck/intnational.lonestar/accessory/sunshield/chrome_2.sii Peterblit 389 Standart Sunshield: /def/vehicle/truck/peterbilt.389/accessory/sunshield/shape03ab.sii Chrome Sunshield: /def/vehicle/truck/peterbilt.389/accessory/sunshield/shape04ab.sii Chrome Sun Visor Sharp: /def/vehicle/truck/peterbilt.389/accessory/sunshield/shape01.sii Chrome Sun Visor Spike: /def/vehicle/truck/peterbilt.389/accessory/sunshield/shape02.sii Peterblit 579 Standart Sunshield: /def/vehicle/truck/peterbilt.579/accessory/sunshield/shape01.sii Exclusive Sunshield: /def/vehicle/truck/peterbilt.579/accessory/sunshield/shape02.sii Exclusive Chrome Sunshield: /def/vehicle/truck/peterbilt.579/accessory/sunshield/shape03.sii Chrome Sun Visor Lux: /def/vehicle/truck/peterbilt.579/accessory/sunshield/shape04.sii Chrome Sun Visor Sharp: /def/vehicle/truck/peterbilt.579/accessory/sunshield/shape05.sii Kenworth T680 Chrome Sun Visor Lux: /def/vehicle/truck/kenworth.t680/accessory/sunshield/shape01.sii Chrome Sun Visor Sharp: /def/vehicle/truck/kenworth.t680/accessory/sunshield/shape02.sii *****EZGOZLAR**EXHAUSTS** Kenworth W900 Plain Stacks: /def/vehicle/truck/kenworth.w900/accessory/exhaust/shape03.sii Standart Exhaust: /def/vehicle/truck/kenworth.w900/accessory/exhaust/shape01.sii International LoneStar Exhaust Bottom: /def/vehicle/truck/intnational.lonestar/accessory/exhaust/bottom.sii Exhaust Dual 1: /def/vehicle/truck/intnational.lonestar/accessory/exhaust/big_double.sii Exhaust Dual 2: /def/vehicle/truck/intnational.lonestar/accessory/exhaust/big_double_a.sii Exhaust Dual 3: /def/vehicle/truck/intnational.lonestar/accessory/exhaust/big_double_b.sii Peterblit 389 Plain Stacks: /def/vehicle/truck/peterbilt.389/accessory/exhaust/shape01.sii Standart Exhaust: /def/vehicle/truck/peterbilt.389/accessory/exhaust/shape02.sii Exclusive Exhaust: /def/vehicle/truck/peterbilt.389/accessory/exhaust/shape03.sii Peterblit 579 Caliber: /def/vehicle/truck/peterbilt.579/accessory/exhaust/shape03.sii Double Caliber: /def/vehicle/truck/peterbilt.579/accessory/exhaust/shape04.sii SCR Eco: /def/vehicle/truck/peterbilt.579/accessory/exhaust/shape06.sii Volvo VNL Single Exhaust: /def/vehicle/truck/volvo.vnl/accessory/exhaust/shape01.sii Dual Exhaust: /def/vehicle/truck/volvo.vnl/accessory/exhaust/shape02.sii SCR Exhaust: /def/vehicle/truck/volvo.vnl/accessory/exhaust/shape04.sii Kenwort T680 Single Exhaust: /def/vehicle/truck/kenworth.t680/accessory/exhaust/shape03.sii Dual Exhaust: /def/vehicle/truck/kenworth.t680/accessory/exhaust/shape04.sii SCR Exhaust: /def/vehicle/truck/kenworth.t680/accessory/exhaust/shape06.sii
-
 Hi! I'll show you how to turn on Free-Cam and how to use it. And since Free-Cam is controlled by NumPad, I'll show you how to switch it to Arrows ENABLING FREE-CAM: 1. Step Open "My Computer" -> Documents -> Euro Truck Simulator 2 2. Step Scroll down, and open "config.cfg" via Right-Clicking, then open it with NotePad (The ".cfg" doesn't have to be there for you, it may just be "config") 3. Step Now press CTRL-F on your keyboard and find (g_console "0") Replace 0 with 1 4. Step Now press CTRL-F on your keyboard and find (g_developer "0") Replace 0 with 1 DONE! Now in-game, click on the 0 above the letters. You control it via NumPad and Mouse. FREE-CAM WITHOUT NUMPAD: 1. Step Open "My Computer" -> Documents -> Euro Truck Simulator 2 2. Step Open "steam_profiles" 3. Step Open your profile. (The best way to know your profile is by the date you changed it. It will change when you turn on the game with the selected profile.) 4. Step Open "controls" via Right-Clicking, then open it with NotePad 5. Step Now press CTRL-F on your keyboard and find "mix dbgfwd" 6. Step Now replace these things: Flying forward is from "mix dbgfwd keyboard.num8?0" to "mix dbgfwd `keyboard.uarrow?0`" Flying backwards is from "mix dbgback keyboard.num5?0" to "mix dbgback `keyboard.darrow?0`" Flying to left is from "mix dbgleft keyboard.larrow?0" to "mix dbgleft `keyboard.larrow?0`" Flying to right is from "mix dbgright keyboard.rarrow?0" to "mix dbgright `keyboard.rarrow?0`" DONE! Now in-game, click on the 0 above the letters. You control it via Arrows and Mouse. Also to make sure you don't move the truck so you have to remove the Arrows setting in the settings to drive the truck.
-
ATS/ETS2 MAP EDITOR GUIDE Welcome to this small handy guide on how to open the map editor. The guide is divided through different section where we make different things. More things getting added soon. Read through this guide carefully and follow the steps in order to get started with the map editor. This tutorial was made for ATS/ETS2 1.44 Table of Content 1 - PREPARATION - Enabling the Map Editor 2 - EDITING - Editing the default map 3 - SAVING - Saving and loading the edited stuff into the game. 4 - TROUBLESHOOTING - Common Problems and issues with the Map Editor -------------------------------------------------------------------------------------------------------------- To all American Truck Simulator users: ATS runs on the same engine which means its the same process, just instead of Euro Truck Simulator 2, all the file paths have to be American Truck Simulator. WARNINGS are marked red. NOTEs are marked yellow. TIPs are marked green. 1 - PREPARATION - Enabling the Map Editor 2 - EDITING - Editing the default map 3 - SAVING - Saving and loading the edited stuff into the game. 4 - TROUBLESHOOTING - Common Problems and issues with the Map Editor Update 23/05/2022 - Added 1.44 support Update 04/04/2022 - Added 1.43 support - Rework of Chapter 1 - Added more troubleshooting solutions Update 19/08/2020 - Added two new troubleshooting problems. - Updated the post to the new 1.38 system. - Made the guide more universal for both games (Part 1/2) Update 08/01/2020 - Added warning for possible 1.40 changes.
- 47 replies
-
- 12
-
-
-
-
-
- map editor
- ets2
- (and 1 more)
-
Hello,everyone! Have you had a wonderful moment and couldn't record it? Or want to report a player(s), but don't know how to record it? Contents: #1 OBS Studio (Need better computer configuration) #2 Radeon Software (Need "AMD" graphics card, if it is "Nvidia" graphics card, please go to #3) #3 Geforce Experience (Need "Nvidia" graphics card, if it is "AMD" graphics card, please go to #2) #4 Bandicam (Need to buy members) #5 Overwolf (Need better computer configuration) #6 MedalTV (Not Yet) #1 The FIrst: OBS Studio It looks like this Recommendation:80% Reasons for recommending and not recommending: Its recording function is very complete, the picture quality is very powerful, the only deficiency is that it requires the user's computer configuration is very high! Requirement:Better computer configuration. OBS Studio official website #2 The Second: Radeon Software It looks like this Recommendation:50% Reasons for recommending and not recommending:It is only applicable to the recording of games, not for software recording, before you have it, you need to have an "AMD" graphics card. Requirement:"AMD" graphics card needed. Radeon Software official website #3 The Third: GEFORCE® EXPERIENCE It looks like this Recommendation:60% Reasons for recommending and not recommending:Compared with "Radon Software", the function of "GEFORCE EXPERIENCE" is very powerful. It can record your games, your software, and even take screenshots of your interface! Requirement:"NVIDIA" graphics card needed. Geforce Experience official website #4 The Fourth: Bandicam it looks like this Recommendation:80% Reasons for recommending and not recommending:Compared with OBS, Bandicam is undoubtedly a video recording software with complete functions, clear image quality and less system memory! But you need to buy it. If you have enough money, I recommend you use it! Requirement: Need to buy membership. Bandicam official website #5 The Fifth: Overwolf it looks like this Recommendation:70% Recommend by JamesS014 Reasons for recommending and not recommending:This video recording software is James recommended to me, and then I downloaded it and used it. This software has a very good picture effect in recording, but it has the same disadvantage as OBS, which requires higher computer configuration.However, it's enough to record your TMP game! Requirement: Better computer configuration needed. Overwolf official website #6 The Sixth: MedalTV it looks like this Recommendation:85% Reasons for recommending and not recommending: You can upload your in-game video quickly. It's a good choice when you need to upload lots of video. (I know lots of Game Moderator use it to upload evidence) Requirement: Not yet. Official website of MedalTV If you want to report a player, you can upload the video to Youtube or other vedio websites. You can refer to this post in the forum! If you have a better video recording software recommendation, feel free to leave a comment below! If you like this article, by make a reaction let me know!
- 51 replies
-
- 10
-
-
-

-
-

-
-
Hello, Here is a short guide on how to take good screenshots using Photo mode in ETS 2. Link to picture uploading site: https://imgbb.com/
-
Salut TruckersMP, Aujourd'hui j'ai créé un guide par rapport à comment uttliser la radio CB en jeu. C'est très simple sauf que ceux qui ne l'ont jamais utlisé ou sont nouveau à TruckersMP ne savent peut-etre pas comment l'uttiliser. Étape 1 Lorsque tu es en jeu sur TruckersMP, ouvre le menu (TAB) et fait un clic-droit pour ouvrir le curseur. Étape 2 Changer le canaux radio CB en utilisant le plus grand bouton. Click le sur la droite pour monter de canaux et click le a gauche pour descendre de canaux. Étape 3 Pour parler, tenir le bouton x en parlant. Pour mettre en sourdine quelqu'un, click sur leur nom, et click la fonction "Mute" et vous ne pourriez pas les entendre! Pour éteindre la radio CB, click le bouton le plus à la gauche. Voici une vidéo: Les règlements prennent place sur la radio CB aussi. Donc pas de langage insultant et mauvais! Si vous voyez des insultes ou du langage inapproprié, soumet un rapport à http://truckersmp.com/reports. Guide officiel par: @El1teZombiezHD Traduit par: @[CJ] TFM DJ ccowie Correction par: -ccowie
-
INTRODUCTION Reverse parking is the most important and usual maneuver, which every driver at the beginning of his career must know in advance. Compared to reality, the execution of this maneuver is much more difficult and does not have the benefits that the game offers, namely the viewing angles of the vehicle assembly (a truck and a semi-trailer). METHOD OF EXECUTION The execution of this maneuver generally differs by several factors, the most important being: place, area and type of semi-trailer. At the same time, the execution mode is very much influenced by the settings in the game of each of you and the maneuverability device used (my game settings are default and I use the keyboard). Scenario presented: Reverse parking using the second viewing angle. Step 1: Take a general look at the place and space available to perform the maneuver; Step 2: Set some landmarks (in my case, parked semi-trailers and parking markings) and position yourself parallel to them. The distance between the vehicle assembly and the reference point or points must be approximately the same as below; Step 3: Start the vehicle assembly in reverse mod, in a straight line, very easily, following immediately after forming an approximately obtuse angle between the truck and the semi-trailer. It is very important to perform this maneuver slowly; Step 4: Continue the maneuverability of the vehicle assembly very easily, opening and closing the previously formed uncle slightly, as necessary, until it is placed in a straight line; Step 5: Maneuver the vehicle assembly in reverse mod, in a straight line, as needed. All the steps explained: FINAL In order to easily learn the ability to perform this maneuver, regardless of the scenario, it is recommended to learn very well the general maneuvering of the set of vehicles (driving back and forth, framing in various places and spaces). Once you learn this maneuver as shown, it will be very easy for you to perform it anywhere, especially if you want to integrate into a virtual company. It also depends a lot on you, how familiar you are with the game. There may be grammatical errors in this guide! Sincerely, @FreakyBodyX
-
 Hello guys, Have you recently experienced a problem with an SSD freezing the OS or game (which can result in unreliable connection kick from MP). Luckily there are solutions to that and I would like to share it with all the others having issues! When buying an SSD, make sure the speeds are listed as MB/s (Megabytes per second), not Mbps. If you plan to get an SSD but don't want to pay a much higher price, then I recommend the Crucial MX500 (not BX500), usually they will be a SATA type. (Make sure they have a DRAM cache) If you would rather have a very high performance SSD then I recommend getting an NVMe SSD (such as a WD Black SN750) IF your PC supports them, these are more expensive but are extremely better performing. Please keep all of the above in mind before purchasing an SSD! ========================================================================================================================== STEP ONE Make sure all your drivers are up to date on Windows! You can do this by opening start and typing "Device Manager". FOR SATA SSDs Look for "IDA/ATA/ATAPI controllers" and select the controller FOR NVMe SSDs Look for "Storage controllers" and select the controller Right click it and press 'Update driver'. Then close device manager. STEP TWO Go to the link below and download the 'registry' file(.reg) - Number 2 https://bit.ly/2EXDe8f Once you have done that and added the registry file, search for "Edit power plan" . Press "Change advanced power settings" Select "Hard Disk" > "AHCI Link Power Management - HIPM/DIPM" > "Setting" and select the option "Active". Click apply and close control panel and power options. STEP THREE If you have a Kingston, SanDisk, Samsung, WD Green/Blue/Black SSD or Crucial use the links below to download their SSD Dashboards. Kingston: https://www.kingston.com/en/support/technical/ssdmanager SanDisk: https://kb.sandisk.com/app/answers/detail/a_id/15108/~/sandisk-ssd-dashboard-support-information (Download option!) Samsung: https://www.samsung.com/semiconductor/minisite/ssd/download/tools/ (SAMSUNG MAGICIAN) Western Digital: https://support.wdc.com/downloads.aspx?p=279 Crucial: https://uk.crucial.com/gbr/en/support-storage-executive Once you have installed the manager for your SSD(s), go to your SSD in the dashboard and check for firmware updates. For example this is WD's dashboard And Crucial's dashboard Make sure to check SSD health, status etc... to make sure your SSD is healthy and not suffering any issues. STEP FOUR Once you have updated your firmware, you should be good to go! If you still unfortunately have issues with freezing, I recommend you follow the steps below! STILL GOT ISSUES? Well you have two options which aren't really what you want to do... 1. Re-install windows on your SSD (make sure to backup your data) and wipe the SSD partitions on install. 2. Contact your SSD manufacturer and see if they can help with the issue(s). If you managed to fix it, congrats! Enjoy trucking. Know any others with SSD issues? Link them here!
 -
There are many fuel stations in ETS2. When you ever visited Duisburg in the Multiplayer you know how many players there are. This guide will show you how to enter the stations, where you can wait for fueling up and how to exit the station again without creating a traffic jam. There are three different types of stations. in this tutorial I only write about the small one because the others are not so important in the Multiplayer. Some important things before we start: Gas stations are not non-collision zone, if you can try to refuel at low traffic areas or at your garages! 1 - Where can I enter? This sounds easy but that is not right. Many users enter the fuel station wrong. It is important to enter correctly otherwise there will be a jam on the station. This are signs at every station which shows where to enter and where not: Here is a photo where you can see the station from the top: When you follow all the traffic rules there would not be that traffic jam like now. 2 - Where can I wait or park? When there is much traffic like in Duisburg you often have to wait before fueling up. But you have to park correctly otherwise there will be also a traffic jam. The green boxes are right parked trucks and the red boxes not. You can see that it is important that the street is clean of parked trucks. Make sure that you do not block the driveways and exits. 3 - Fuel up together It is also possible fuel up with two trucks at the same moment! But be careful when you want to exit. Remember that you have to park as right as possible. 4 - Where to exit? When you want to exit the station be sure that nobody is on the street and you can drive on the road without blocking other drivers. Remember the right direction to exit. Thank you for reading my tutorial. Please rate comment! Enjoy your day, Lasse
-
Good evening ladies and gentlemen, Since Germany is located in Middle Europe, it is the middle of the map. A lot truckers have to cross Germany to reach their destination. I want to quickly provide a few common things, not every trucker knows, because Germany has one of the most developed street systems worldwide, even without having speedlimits on some points (no don't hope, for trucks there is always a speed limit ) So first of all, I want to quickly start with the sign everyone sees, when he enters Germany. <- shows speed limits for cars outside, inside villages and on German "Autobahn" Important for us is, that this is car only. For trucks it is 50 inside cities, and outside, it depends on the weight of the truck. If it is between 3,5 and 7,5t, you are allowed to drive 80 on streets. On motorway, everyone, no matter what weight he has is only allowed to drive 80km/h. If he is allowed to drive 100 (needs 100 sign, signed by TÜV (German Law)) he can drive 100 but on motorways only! By the way, the blue sign with the 130 is not a speed limit, it is a speed you should drive. If you make mistakes or having accidents and you can't proof that this would also happen when you drive less than 130, then it is automatically your fault! Follow pictures are also important for you! - shows the speed limit, applies to every vehicle on the road, if not marked under it. - this sign can be under a speed limit, so this speed limit is now applying to trucks only! - general prohibition of over taking other vehicles. Permanent lines between both sides are also showing this kind of prohibition. - If you see this, you can cross the intersection. But keep in mind chapter #2 - A stop sign. A full stop is required to make sure, noone is coming from left or right. - You can slowly drive forward and make sure noones coming at the same time. If someone comes, a stop is required! You are still the second in queue! - A railway crosses the street, 3 stripe sign is 240 in front of the railway, the two stripe on 160m, the one stripe 80m! Chapter #2 with translation pyramide showing the chain of command in a street intersection! Blue is police, orange is traffic light, red is Sign and green is right before left Police - The police is the highest in chain of command. If police stands on traffic intersection and is ruling traffic, everyone has to listen to police, no matter what colour the traffic lights are showing. He can overrule the traffic light and every other rule! Traffic light - If there is no police officer, and the traffic lights are running, they are automatically the highest you have to listen to. If they show red, you have to stop. If they show green, you are allowed to drive. Sign - Sometimes, traffic lights are not working i.E. they are under construction, damaged or it is just night and the city wants to save energy, so they put it on orange. It will light just orange. You will be confronted with this in ETS since traffic lights are shutting down in the night. Now the signs are the highest. Watch chapter #1 for more information about signs. Right before left - If there is nothing enabled, no sign and no police, there will be right before left. It is an easy rule but mistakes can still be done. You won't be confronted since you cant pass lower populated city areas or small villages. They often have it on their streets. In this case, the Blue would be allowed to drive, since there is noone on the right side of him. Red has to let Blue pass first, because Blue is right next on the right side of Red. If Blue passed, Red is allowed to pass the intersection because since Blue passed, there is noone on the right side anymore. If red passed, green can also pass, because red is gone, so the right side is free for green. It sounds confusing but its pretty easy to learn! Chapter #3 Driving on the street and watching other traffic Overtaking on the rightest lane is forbidden except inside cities. Thats why you can't freely choose your lanes like you can do it inside cities. Outside of them, there is a law, which forces you to drive on the right side of the road to give others the possibility, overtaking you legally and safely. Always drive on the right lane, until you actually enter a city or overtaking someone. In the following pictures, you can see exceptions, when it is allowed, driving on other sides! - if someone enters the Autobahn, make sure you give him the space to enter it. Look in your mirror and go on the left lane to give him a legal possibility to enter the lane! - you entered a city. Left sign is letting you know, you entered and two right signs are letting you know, you left a city! - You overtake someone and you have to use the left lane! In case of a traffic jam, you should drive carefully. If you are on multiple lane roads, always form a way for emergency vehicles. To make it easy, the lane on the left side has to give space by driving close to the edge of the left side. All the other lanes have to drive right so between the first lane from left and the second from left is a space for emergency vehicles! Now other common things, you should watch... Its showing a circle. Do not rush into it. Watch for other traffic. You can join it without having indicator enabled but if you leave indicate your direction! - safe explaining, you enter a tunnel but switch on your lights! - shows, that all vehicles are forbidden. If there is a car inside, all vehicles as big as and bigger as a car are forbidden. If a truck the same thing with just truck! Now a general information. Do not use your bright lights when there is other traffic. In ETS2 your not blinding someone, but in real life, you are. So turn the bright lights off and just use the normal ones! And watch these signs, they are the most important for you! and btw dont forget the traffic lights! German Autobahn facts: - over 13000 kilometers long - connecting west, east, north and south (N, E, S, W) - Having an A for Autobahn and a count i.E. A420 (dont know if this excists) - Minimal speed limit is 60, if there is fog which disables visibility and you enable fog lights, you can only drive 50 so this is the only exception! Blue sign with two lanes and a bridge
-
In road traffic, there are many ways to communicate with the other drivers. For example, if the other driver gives you the lead in the turn or waits patiently for you to step out of a tight space. To show their appreciation, some drivers prefer to use the flashlight in return. In many situations flashing signs are common Not only in situations like these, various gestures have become established - even internationally. No matter if you are passing an intersection or overtaking: For many situations on the road, an unofficial sign language has emerged over the years. Because of that, drivers give light, horn or other signals in different situations to give other road users some kind of assistance, information and/or help. Especially truck drivers often use their flashing lights Here are some of the general signs: Short signal to the right = No traffic at the front or I don't want to drive faster (You can overtake now) Please remember that this does not in all cases mean that the road is clear. The truck driver at the front of you could also actually want to turn or come to a stop, therefore you always have to make sure that there is no oncoming traffic before pulling out for your overtaking maneuver. Short flashing light between truck drivers Your distance to my truck is long enough and you can switch your lane again Reason: So that the following traffic doesn't have to drive slow, the rear driver gives the overtaking truck an indication that they can change the lane again. The overtaking process is accelerated. The overtaking truck driver has to trust the other one that the distance is long enough. In dark conditions he can't see his tail.. and would normally have to stay in the left lane much longer until he can see the headlights or the complete vehicle of the overtaken truck in his mirrors. This light signal is therefore a helpful hint for all long vehicles and helps to keep the traffic go smooth. Changing left/right turn signal (or short flashing of the warning lights) Thank you When overtaking you see a vehicle at the front indicating to the left Attention!!! There comes oncoming traffic from the front Reason: There are certain situation the overtaking truck can't see... but the driver in the column can. The sudden left indicating doesn't mean that the overtaken truck wants to switch the lane or make a turn, put he wants to draw attention on the danger. This is his only way to give a sign you can see. In such a case you should always look for a gap and pay attention to what is going on ahead. In an emergency, you can "disappear" in the gap fast and avoid an accident. For the drivers in the convoy it also means: keep enough distance so that another truck can pull in if necessary. Short light from a following vehicle in the fast lane or the left turn signal Please finish the overtaking process. I want to pass Both are possible ways to show the intention of overtaking.... as long as the safety distance is maintained and it is only a one-time situation. Continuous flashing lights or not keeping enough distance is a punishable in real life as well as in-game. Flashing light from oncoming traffic Attention!!! Danger/accident on the road You should drive along carefully and be able to slow down because there could be a traffic jam/ accident... and therefore drive on the right and slow down. If someone uses the flashing lights multiple times, it often indicate a big danger. On the highway, this could be a wrong way driver / ghost driver. The drivers try to warn you of a danger they've just seen. Flashing light from the oncoming traffic in dark conditions Your headlights are activated and I can't see something And of course you always say "Thank you" if someone helped you... Sometimes a little visual conversation arises. Thank you = Left and right signal or a short flashing of the warning lights if the helper drives behind you. No Problem = Short flashing from behind If you know other signals, you can post them below Leon
-
For some who have seen my replays I am using FaceTrackNoIR software with my Plexgear 720p Cam. What this software is, is that it's a cheap / almost free version of the TrackIR where you only need a CAM and the Software which can be purchased for roughly 2,5€. Think about a Cam you might have laying around or a cheap one you wanted to buy then you add that with this software and you get a cheap Face Tracking that doesn't cost a fortune! I would highly recommend this for users who doesn't have much money and want a quick but also a semi-solution for now! My quick guide of this is not so indepth but I will go through the basics on how to set it up (My way) First off you need your cam, some are not supported according to the site but mine isn't either but it sure works! (Plexgear 720p Cam) Then you need your FaceTrackNoIR Software When you buy it, you will get a download link to the program on your mail and it's a quick install. There is a lot of information on their site which I provided in this guide and you can read other's experiences with it. When you launch the Software it will look sort of like this: When the front side looks like in the spoiler then you can move onto the Curves. Now shortkeys! These are important! Issues you might come across / Solutions to those and also some explainations Changing your Camera position in-game will change the Camera Reset point to that position! There is no need to setup anything in-game as it automatically should do that for you. Just start FaceTrackNoIR first and then the game! If I find anything new to attach to this guide then I will post new things inside the guide. (I highly recommend trying it with a Steering Wheel!) Interested in how it looks for me? Here is my Plays.tv where I have both my report clips and some random clips where I park and such Note also: When going into low FPS areas, the tracking will lag too in-game so you might want to Pause the Camera Movement and drive safe! [+New]Important: If you have glasses like I do then I hope that you can actually see without them or have non-reflecting glasses. My glasses reflect the light from anything in my room and my monitors so the camera cannot pick up my eyes and then crops the face grid down below your glasses which will make your camera look elsewhere whenever you turn your head in any way. Contacts, non-reflecting glasses or no glasses is the way to go sadly... I know terrible.. I have tried this for a long time and I sadly cannot afford any Non-reflecting glasses as of now to test and I can also not get any contacts yet as I have not met the requirements. I only need my glasses for reading or looking far away unless I want to get close on both parts so it isn't a big issue for me. [+New]As I've gotten questions about the ceiling lamp being on all the time when using FaceTrackNoIR, I've confirmed you don't need it on actually.. However you need a source of light located infront of you then that just lights up your face good enough on left and right side. I use both my left and right extra monitors with two browsers up. I use TruckersMP's forum site as it is bright and works perfect! I changed my settings on the monitors to 100brightness and 80contrast which isn't to bright or to dimmed. When having this type of light source your tracking will be somewhat risky depending on how your camera is tracking but I would recommend playing around with this for a while before deciding to just constantly go with that under heavy traffic. When you're in a Non-collision-zone I'd highly recommend you sit motionless and look forward in your truck and try to notice any movement. Move your head left and right gently and see if it jerks. Go all the way to the end of your Curves that you have set and then move back to the middle. If you notice the camera not being lined up anymore you center it and redo the process again to see if it works for you. I am going to do this without my two other monitors on and just using the game as source of light in day / night cycle of the game. Note that this test was done 3am during the winter so it's pitch black in my room. I also tested doing this in American Truck Simulator so it's working totally fine with the settings I have and I can confirm my settings are supporting ATS right now. Videos (using this software supports the developer of it. He has his story about it on the software website!) I am available for questions at anytime! You can comment here for questions if there was anything you were to wonder about. I will reply at anytime I am on my computer (which is most of the days / nights!) ~1nYX Changelog / Update to the Guide Things that is planned to be added so far to this guide. Don't forget to make multiple profile saves for each major changes you make so you have both smooth / sensetive / steep or any other settings profiles you want. Always great to be safe and save the pervious setup to recover! (I am really driven to make a perfect guide for this software. I use it everyday and It's a great starter program for those who already owns a Webcam or wanted to buy one anyways!) (Thanks also for the 4 Upvotes on this guide and 150+ Views! Doesn't seem much to others but it's a lot to me)
- 9 replies
-
- 6
-
-
- guide
- camera guide
- (and 6 more)
-
mouse steering [Guide] How to adjust mouse steering?
Kamyoncu Lütfü Bey posted a topic in Game settings
Hello dear truckers! This guide shows how to adjust mouse steering in Euro Truck Simulator 2. If you're ready, let's start. First of all open the game. Right after that press "Options" which is shown with red in the photo down below. Press "Controls" from the options tab. Press the "Keyboard only" text at the top. Then press the "Keyboard + Mouse Steering" option. Mouse steering is enabled at this stage. For a better experience, you can adjust the sensitivity of the steering wheel with the "Steering sensitivity" option shown in the photo below. Choose the best sensitivity according to your driving style. Note: This guide is the English version of my guide. See you on the roads, stay healthy! Kind regards, Kamyoncu Lütfü Bey -
Merhaba Kamyoncular Bu Rehber'de Sizlere TruckersMP Site Üzeri Rapor Nasıl Edilir Onu Göstereceğim. Adımları Teker Teker İzleyiniz. Profil kısmına gelip Reports yerine tıklayın Tıkladıktan sonra önünüze gelen sayfada New Report yazısına tıklayınız. Karşınıza gelecek sayfada doldurmanız gereken boşluk var rapor edeceğiniz kişinin oyunda /pinfo <game-id> yazınca TruckersMP ID yazan sayıları buraya yazınız Sonra önünüze gelecek diğer boşlukları Eksiksiz, Doğru, Düzgün doldurun ve Evidence kısmına kanıtınızı atmayı unutmayın Son olarak her şeyi kontrol ettikten sonra en aşağıya inerek Create Report yazısına basınız. Umarım bu rehber size bir şey öğretmiştir. Her şey için çok teşekkür ederim.
-
Hi, I made video how to share your paintjob colors with others. This will be the most useful to the company owners who needs that all his drivers has same colors as you. The original post on this topic (no longer works) -
-
Now we have all heard of the infamous Europoort where it can cause many bans/kicks and also many trips to the repair station. With the help of some fellow truckers (mentioned in the text somewhere) and what I've seen from driving, I have come up with a survival guide on europort. Most important tip - Treat people how you want to be treated and don't do stuff you wouldn't do in real life There is also an ETS2MP based Highway code you can read (W.I.P) CCTV If you know your journey goes through Europoort, you can check the CCTV to see how busy it is Reporting The following links will help you report someone in game. Report System Report System Help You're banned, what do i do? You can make an appeal here Journey to Rotterdam/Europoort Make sure you have plenty of fuel, Make sure your truck is 0 or a relativity low damage point, If it above 10%, i would recommend having a repair because engine problems can be a pain and may annoy other truckers. Journey towards Europoort I recommend staying in the left lane as this means you won't need to change lane and at the merge lane section, this will cause less problems and possibly less queues From the merge lane to the europoort, make sure you don't go on the wrong side of the road as this will cause you more problems, possibly delay your delivery even more as you will have to battle two sides of road at the same time and it will mainly lead you into a ban. As well as this when you are doing jobs, Your GPS will tell you to follow the blue line, But if it busy on that area, Use the red line, I have found this to be faster and less congested then the blue line Europoort non-collison zones The lines in Orange is where the Non-collision start (Going towards the port) and close (Going away from the port), If you have a trailer truck when going out, please bare this in mind and if you are going out without a trailer, please slow down and leave enough room so you don't go inside of the truck and cause problems. Aurora has created a useful video on how to survive in Europoort which is better than mine Dashcam For recording Rammers etc, i recommended a service called Plays.tv or shadowplay (Nvidia only) Plays.tv or shadowplay will allow you to record a crash that just happened, you press two keys on your keyboard and then it'll record a previous 2 mins or how ever long you have set it for and then you upload it online and then fill out a report. Plays.tv is like YouTube where you can upload videos but in game you press the key bind to record like the last 2 mins or more then you close the game and open up the plays.tv editor which allows you to crop the video down and then you upload it to plays.tv General Tips Turn of beacons whilst in the area if it is laggy as this will reduce lag. If you know your truck is truly stuck or broken down press F7 and enter as soon as possible, This will make everyone's lives easier. "I noticed one thing driving with 30%+ damaged tires... once the tires get to a point in % the damage bar only shows the tires damage so you dont know the actual damage with out going to the Diagnosis part of the game (stop in a safe spot hit esc its on the right under my truck). Why drive with damaged tires? Well for one thing if you know what your doing even at 50% the truck is controllable. Second anything beyond 40% simulates a snowy/icy road." - Egg-Roll If you accidentally hit someone just say sorry an that you didn't mean it, so it doesn't escalate further down the road or in chat. If you want to leave the game, park up somewhere safe so you don't spawn in the middle of the road. Don't spam the horn, 1 or 2 times may be long enough but not 10 times in a short time as this is annoying (If they didn't hear you the first time, they probably didn't hear you the 100th time.You could also use your light horn in your truck (Basically turns your lights on for a short time) Make sure you leave plenty of room between you and the truck infront Just have patience seen as the admins are doing everything Also please don't push in, This will generally happen when there is a long queue but people drive past on the wrong side to get further into the queue. Please don't do this and this may hold you even longer and if people are like me ( ), were they hate people who jump in, They will make sure you don't push infront of them. If you require the need to chat, it may be better to stop the truck as I've found from personal experiences is that driving at 55mph in a built up area then you use chat, your truck then has no control so you crash and possibly annoy someone. Sometimes use an external view instead of a internal view as this may save abit of your framerate, you can also press F11 which will turn off player tags (Saves around 3 - 7 FPS, as tesco says, every little helps) Try and remember the correct side of the road you're driving on when going to Ferries - Uk (Left side) Outside of UK (Right side) Also don't park in the tunnel before europoort (Like i did in the pic) as this can be highly annoying at times More tips - thecharrr If you got a longer load, aka not special containers, and unsure if you can make the turn without going in the other lane at the first curve in, enter the opposing lane before turning. The GPS route is the one you want when heading out, as you still need to make a right anyways Loading into ETS2MP around Rotterdam should be done within no collide areas otherwise you highly risk loading into someone else and giving someone a bad day Avoiding Europort is a better idea overall, especially when the 2.5k player cap is gone. Anyway good luck truckers:) P.S. if you don't feel like going into Rotterdam, travel to Amsterdam, It is only a couple of mins longer added onto your journey but it can be generally safer. WARNING - New rule has been implemented Useless traffic in excessively high population areas - Kick / Ban Useless traffic in excessively high population areas such as Europoort, Rotterdam or the roads surrounding Oxnard. Driving without reason to and from or anything similar.
- 103 replies
-
- 31
-
-
-
-
Today i found a very cool guide how to change the normally backgrounds in ETS2MP Menu to a diffrent! ATTENTION TO THE PLAYERS! The new Launcher of TruckersMP corrypted the data folder which contains the ui for a long time now and there is no way to change the background now. So this guide doesnt work anymore! So what you need for that. You need a photo in ETS2 for that. 1. Go to your computer/Program Files (if you have Program Files (x86), doesnt matter, just you need to find Euro Truck Simulator 2 Multiplayer)/Euro Truck Simulator 2 Multiplayer/data/ui. 2. You will see photos and if you search you will see the background photos. Rename your photo too: background0. 4. Put the background0 to "ui" folder and replace it. NOTE: Do not delete the background0 in the "ui" folder because if you put a new photo but have the same name like before, your ETS2MP Menu will be red screen. 5. Copy the background0 (your photo) and paste it in desktop. Rename it to "background1" and replace it to the background1 (ETS2MP Photo Menu) it in ui folder. 6. Repeat step 5 but rename the background1 to background2 and replace it to the background2 (ETS2MP Photos Menu). You should playing without red screen. 14-11-15 I decided it to edit it because i found a way to not shine red screen. 22-4-18 The guide is completely shuted down! After the TruckersMP launcher folder on the Programs File doesn't have the data folder which contains ui, i think you can't do anything to change the background after you enter into the ETS2MP or ATSMP Launcher. If there is someone who can help me, i will restart the guide.
-
Guide permettant de savoir comment dépasser / être dépassé correctement DESYNC Ce que vous voyez sur votre écran n'est pas forcément ce que les autres joueurs voient. Cela pourrait causer des collisions (pas intentionnels) dans de nombreuses situations. Pour contrer cet effet, voici quelques informations que vous devriez suivre. Quand vous doublez - Commencez votre manoeuvre lorsque vous vous trouvez à au moins 60 m du camion devant vous (vous pouvez toujours vérifier les distances à l’aide de la touche <TAB>). - Restez en ligne - Lorsque vous avez vérifié que l'autre joueur se trouve à 100 m derrière vous, vous pouvez commencer à vous rabattre. - Autrement, si vous voyez l'autre conducteur faire un appel de phares ou l'entendre klaxonner deux fois, cela signifie que vous pouvez vous rabattre en toute sécurité de son point de vue, même si vous n'êtes pas à 100m. Dans ce cas, il est agréable de le remercier en utilisant les warning. Quand vous êtes doublé - Restez sur votre voie - Ralentissez pour permettre à l'autre joueur de vous doubler plus rapidement et facilement - Quand il y a assez de distance entre le le camion est vous, faites un appel de phares ou klaxonnez pour lui signaler qu'il peut se rabattre en toute sécurité. Espérons que tout le monde respecte ces règles, Bonne route
-
Hello! Welcome to the survival guide to parking! *Any and all information can and will be updated to be correct. Welcome to my guide and tips on parking in ATS. I recently found that its rather difficult parking in tight spaces based on a few things. To get started I'm going to share the (what I think) is the most useful knowledge for the game in the parking world. Tip #1: When ever you can use a shorter framed truck! Shorter frames make you smaller and easier to maneuver in these tight spaces. Don't get me wrong the longer frame can be used to park in these small areas but the smaller frame will help until you get the practice! (Small frame above) (Longer frame above) Tip #2: Less trailer axles the better! The less axles (set of tires each on the left and right side) make it so the trailer can maneuver better due to the fact is only is on fewer axles. Again don't get me wrong if you want a higher challenge you can take more axle trailers! (Images will be added once I find another job for it) To-do: * Tutorials for parking in specific places. * Images for trailers. * Add community tips and tricks.
-
Hi all, I have made a guide (work in progress) That I would liek to share http://bit.ly/1EsmEGY I hope this helps soem people
- 10 replies
-
- 2
-
-
- truck driver
- hanbook
- (and 2 more)


_StVO_1981_svg.png.faad71585d017900b3bb7f4b709ec4c5.png)


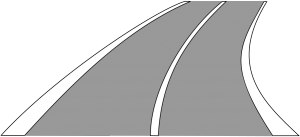


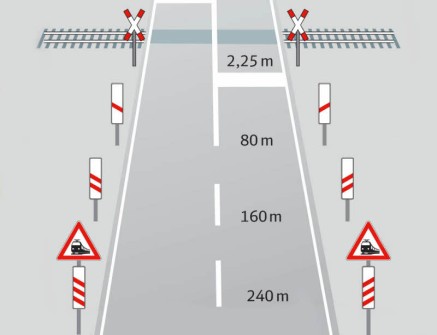
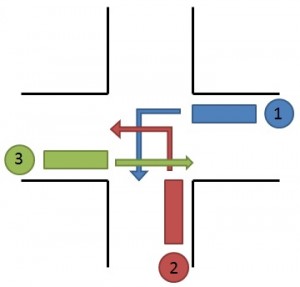

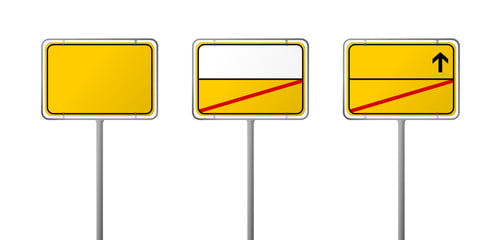

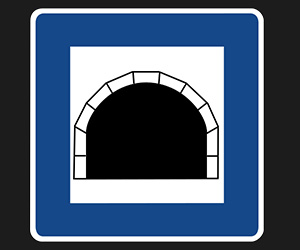


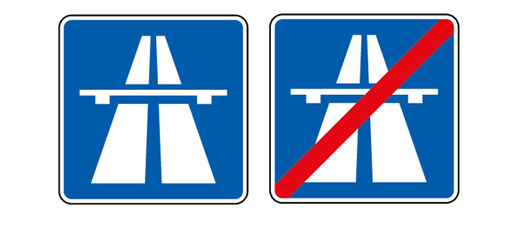


![[VIVΛ HH] KЯΛVΛTIΞ](https://forum.truckersmp.com/uploads/monthly_2025_05/imported-photo-2089.thumb.png.e6281ea40b22d235b15c35bdaca0836f.png)